
So, you’re thinking of starting a blog? Woohoo! We’re so excited for you! Obviously, all of us at The Blogger Union are advocates for blogging. We believe it’s a great way to express yourself + create a business and life you love.
We know the techie part about getting your site up can be totally overwhelming. We get it. And the reason we do this free class is because we don’t want that fear to stop you from starting your blog. Why do we want you to start your blog? Mainly for selfish reasons: because we know that your message and you living your purpose can change the world. And we would would like that. So let’s change the world, shall we?

STEP 1: Believe in Yourself!
For all our Latina friends out there, this saying sounds pretty awesome in Spanish: Si se puede! Yes you can!
Why are we cheering you on with the cheesiest slogan ever? Well, because you need to hear this. The main reason people don’t jump over the technical hump, is because they don’t believe they can actually do it. For some of us, the techie stuff automatically has us checking out.
Seriously, you need to believe that you can do this. If not, it’s going to be a frustrating process. So let’s take a quick moment, to reprogram our minds. Repeat after me, my friend: “I can do this. I am completely capable of building my own website, I just need to believe I can.”
If you ever find yourself, overwhelmed, or super scared, remind yourself why you’re doing this. Think of the happiness your site will bring. Think of all the people you will help. Focusing on the positive outcomes, will give you the courage you need to move forward.
STEP 2: Think About a Domain Name
The first thing you’re going to need is a domain. A domain is the title of your site. In technical terms, it’s a string of characters that define the location of a website. So for example, our domain is TheBloggerUnion.com. I like to see it as buying land.
Some people who just start up make the mistake of using a free account with WordPress, Blogspot or any other provider. I feel this is a mistake because you don’t own the domain. If we’re looking at purchasing a domain as purchasing land, using a free account would be like renting.
Even if you’re not sure where this blogging journey will take you, I believe it’s better to be safe than sorry. Invest in yourself. You never know where this can take you.
If you’re feeling stuck on what you should name your blog, we have this great article and a handy worksheet that will help you narrow down your choices.
Also, when thinking about a domain name, you want to keep the following tips in mind:
- Pick a name that is easy to pronounce, read, and write.
- Stay away from numbers and hyphens.
- Go with a .com if possible.
- If you’re looking to make your site SEO friendly, consider using one of your keywords
STEP 3: Buy Your Domain and a Hosting Provider – CLICK HERE TO START YOUR BLOG

Full disclosure, we do receive a commission if you sign up using the links in this tutorial. If you want to support us because you are reading this free guide go ahead and click on the links within this post. If you’d rather not use our affiliate links, it’s okay too.
Alright, once you know what domain you want to buy, it’s time to, well, buy it! Depending on what you pick, the price will vary, but if it’s not a premium domain, it will cost you around $12 on most domain sites. But if you click the following link, you will get your domain for FREE.
In addition to buying your domain, you’ll need to purchase hosting. Owning your domain, just means you own the name. Hosting is a monthly cost that allows you to run your website using your domain.
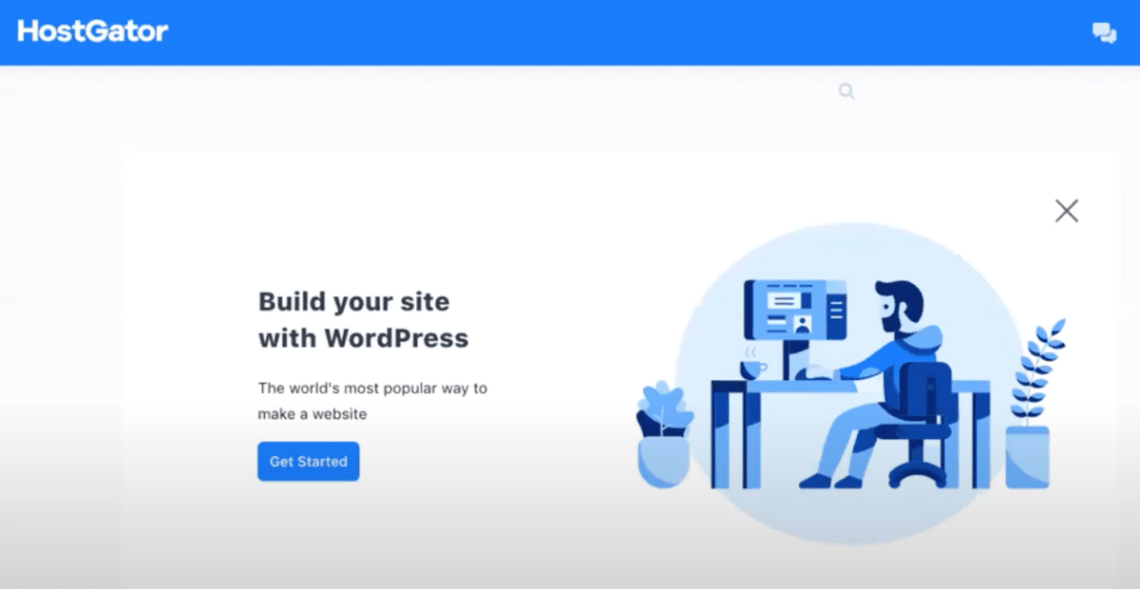
One of the best ways to save is by buying your domain and hosting from the same provider this way you receive a deal. For example, we recommend using HostGator because it’s affordable and reliable. Plus, they have great customer service. When it comes to techy stuff, you always want to make sure you can get someone on the phone when you’re experiencing a problem.
Get started by clicking here to go to HostGator. Once you’re on HostGator.com, click on the orange button that says Get Started!
STEP 4: Select Your Plan
The first thing you’ll be asked is to select your plan. If you’re just starting off, the Hatchling plan is a great choice. You really don’t need more than what’s being offered. If you’re thinking of opening several sites, you’ll want to go with the Baby Plan. The best thing is all plans come with a free domain name and SSL certificate. An SSL certificate adds the little lock next to your domain in the browser and makes your site encrypted. Having SSL will help your ranking on Google search result pages.
Just click on one of the yellow buttons titled Buy Now!
STEP 5: Pick a Domain Name

Like I mentioned above, a domain is your web address. If you did your assignment, like the good student you are, you already have your domain in mind.
At this screen on HostGator, you’ll enter your desired domain name under the box titled Enter Your Domain. If you already own a domain name, you’ll enter that that in the box titled I Already Own This Domain.
Click the Next button in blue.
Savings Tip: Uncheck Domain Privacy Protection
If you are looking for the most affordable hosting plan, we recommend unchecking the Add Domain Privacy to your domain box. But if you’re using your home address to set up your domain, you may want to go with Domain Privacy Protection in order to keep that information private.

STEP 6: Choose Your Hosting Package

Scroll down and you’ll see Choose a Hosting Plan. Here you will pick your hosting plan depending on how far in advance you want to pay. I recommend the 12 month billing cycle. You’ll notice that HostGator bills per year, but it’s still very affordable when you break it down by month.
Savings Tip: Uncheck all Additional Services

Here, they’ll offer you a bunch of add-ons. I don’t add anything on.
STEP 7: Enter Your Billing Information

Next step is pretty simple: enter in your money, honey. Or, at least your billing deets.
STEP 8: Enter Your Billing Info

After entering in your info, you’ll want to click on that little box that says, “You have read and agree to HostGator’s Terms of Service” But before doing that, maybe read the agreement just in case, right?
Then click the blue button that says Checkout Now!
STEP 9: Almost Done!
As soon as you complete your purchase, you’ll receive an email from HostGator welcoming you to the service. In that email will be your control panel login info. Make sure you hold on to this.
You’re all set with your domain and hosting. But now you’ll want to install a content management system, which is the easiest way to run your blog. For this class, we’re going to use WordPress. WordPress is the most commonly used CMS program and it’s highly customizable. Tons of big companies use it like CNN and Times, so know you’re in good company.
Alright, let’s get started with your WordPress installation.
STEP 10: Click on Get Started Button
STEP 11: Install WordPress

Leave the Software Setup section with the default settings and skip to Site Settings. Add your Site Name and Site Description in the text fields.

In the Admin Account section, pick a username and password you will remember. I recommend using an email you already own for the Admin Email something like a Gmail account would be perfect. This is in case you forget your password, you can ask your site to send you a password recovery email to this email address.

Leave the Language, Plugins, Advanced Options, and Theme sections with the default settings and skip to the bottom and click the blue Install button. I also recommend you add your email in the field “Email installation details to:”

STEP 12: Wrapping Up

So now, you should see “Your Install is Completed.” You’ll then be receiving another welcome email, but this one will be from WordPress. You’ll want to save this email as well.
In this email, you’ll receive your Login URL for WordPress, which will give you access to your dashboard. This dashboard is where you will post your blog posts and manage everything having to do with your website, including design.
Again, you’ll receive a link that brings you to the login in page of your WordPress site, but typically it will be yourdomain.com/wp-admin. Go ahead and enter your username and password.

Voilà! From here, you can start customizing your site. If you’re interested in learning about how you can customize your WordPress site, check out The Blogger Union’s Installing a WordPress Theme webinar.
 Watch Installing a WordPress Theme Webinar
Well, this is where we leave you. We wish you so many great blessing in this new journey. The Blogger Union is here for you! Find a chapter near you or connect with us on Facebook. See you soon!


7 Comments
Veronica Rushton
April 11, 2016 at 5:33 pmHi! Great post, I just have one question. I’m currently blogging through WordPress.com is there a way to transfer over my blog post from that site once I join a hosting site?
*Founder: Paola Mendez
April 13, 2016 at 12:25 pmHi Veronica! Yes, there is. WordPress.com has a way to export your posts. In your dashboard go to Tools > Export. Then, in your new self hosted wordpress site go to Tools > Import 🙂 Hope that helps!
Emely
September 2, 2017 at 7:18 pmWhat is the benefit of having mu blog on bluehosting account or wordpress? I have a personal blog account on wordpress…
*Founder: Paola Mendez
September 15, 2017 at 3:00 pmHi Emely,
There are several benefits including:
– You can install plugins (you have to be on a business plan to do this on wordpress.com)
– You have better control of your SEO (by installing plugins)
– You can sell ads (you have to be in the premium or business plan to do this on wordpress.com)
– You don’t have to pay to remove wordpress branding or other ads they display on your site
– You can use Google Analytics instead of the limited analytics wordpress.com offers
Overall you have more control of your site, when you use a separate host for your blog. Please let me know if you have any other questions.
Cheers!
Paola
Angie Ariza
August 17, 2018 at 6:09 pmSo which one would you recommend better?
Blue hustings or WordPress
*Founder: Paola Mendez
August 20, 2018 at 12:42 pmHi Angie,
We recommend using WordPress.org combined with Blue Hosting. However, if you feel intimidated by connecting both services (as outlined in this tutorial), we recommend just starting with WordPress.com. You can use your own custom domain by paying their monthly fees.
Cheers!
Paola
How to Embody Your CEO Role as a Blogging Business Owner - The Blogger UnionThe Blogger Union
June 17, 2021 at 1:54 pm[…] you want your blog to make money, you have to treat it like a business. This means having a domain name and matching email account, having the appropriate legal pages on your blog, and having it ready for other business […]