
Homework: Pick a Domain
The first step to creating your own website is deciding what will be your home address or URL. Fill out the worksheet below to figure out the best domain for your new website.
 Click here to download the Domain Worksheet
Keep Track of Important Information: Website Cheatsheet
The number one problem I see with people who build their sites, is that they forget how to log in to their website. They don’t remember their password. They don’t remember their username.
Use the following Website Cheatsheet to keep all your important information handy. Fill it out as we go and email it to yourself for quick reference when updating your website.
 Click here to download the Website Cheatsheet
Links to Follow Along Webinar
Click here to Begin Host Gator Hosting
Build Your Blog With WordPress
About The Blogger Union
My name is Paola Mendez and I am the founder of The Blogger Union. For those of you who are not familiar with The Blogger Union, it’s a network of blogger communities across the US; and our goal is to help our members grow their brands and blogs through in-person meetups and online workshops just like this one.
Blogger Communities
We have communities all across the U.S. I run the South Florida Bloggers here in the Miami area. We also have the New York City Bloggers, the DC Bloggers, the Minneapolis Bloggers, Houston Bloggers and a bunch of
others. Actually, we have some of those chapter officers on the call today. Hi, Carly! (She runs the DC bloggers).
My personal blog is coralgableslove.com in case you want to check it out.
Sharing Your Message With Your Blog
I’m always really excited to teach this workshop because you have all of these ideas that you want to share with the world and we are going to help you build that website today. So that you can share it with the world.
Here with me today, helping me is, Andrea Mendez. She is the co-founder of The Blogger Union. She us usually behind the scenes. She’s in charge of all of our branding, our graphic design, our logo. All of that good stuff. She founded the graphic design company Vintage Unicorn. You can follow
her on Instagram @vintageunicorndesign.
Andrea: Hello everyone! I am a freelance graphic designer and I will be helping out Paola if you have any questions. I’ll be keeping an eye on the chat. I will be posting the links to make it easier for you throughout the chat as well. I am very happy to be here with you.
Paola: Awesome, thank you so much.
Yes! You Can Build Your Own Blog
Alrighty, before we get started I think the first thing we need to do is take a moment. If you’re feeling a little bit hesitant or you’re a little bit worried that we’re about to jump into some technical stuff. Don’t worry about it.
Take a moment and say out loud, “You can do this.” We’re here to help you. Andrea and I are gonna walk you through this. Don’t feel overwhelmed about starting your website. You have something that you want to share. You have a message. You have a purpose and you want to get it out in the world. We are going to build that website today.
So let’s all get in the right mindset; and say “Yes! We can do this.”
Who is This Workshop For?
Before we jump right into this I do want to clarify who this workshop is for. This workshop is for people who are starting from scratch.
That means you haven’t purchased your domain yet. You haven’t tried to build your website with some service and you got stuck along the way. Figuring out what went wrong would take a lot of troubleshooting and we do have quite a bit of people on this call for us to troubleshoot everyone.
We’re just going to go through the process of starting from scratch. So if you started the process and you got stuck – my recommendation is to start again. Just come up with a new domain today as we go through and start from scratch. That’s going to be your easiest solution.
Why are you building a website?
Okay! In the chat, can you guys tell me why you are building a website? Are you a content creator and/or an influencer, are you a small business
you’re trying to build a website for your business, or you’re a photographer you want to build a portfolio. If you can tell me in the chat. I would love to to find out.
So today, we have some content creators. We have a small business. Content creators, someone wants to build a portfolio. Recipes, fitness industry, non-profit. Okay,
wonderful! You guys are all in the right place. Because we all have to build those websites the same way.
We’re going to start building our website with WordPress.
Getting Started: Building Your Blog with WordPress
The first step is to go to the link: thebloggerunion.com/wordpress. (If you’re reading the transcript, you’re already here. Yay!)
That page that I built for us has a bunch of resources that we can just click from there.
Figuring Out Your Domain
I sent you an email with the homework which was going to help you to figure out your domain. I’m gonna quickly run through it for those of you who did not receive this beforehand.
We want to figure out the domain for our website. The domain is the web address for your website. For example, the domain from my website is coralgableslove.com. You want to figure out which one you want for your website.
Tips For Picking The Best Domain For Your Blog
A few things to keep in mind are, that you want something that’s easy to pronounce, read, and write. If it’s a mouthful, if you’re using a word that can be written two different ways. You want to stay away from that so that you don’t lose people typing your your domain into the web browser.
You also want to stay away from numbers and hyphens. The easier, the more simple your domain, the better.
Another thing to keep in mind is that there’s a bunch of endings to domains now. So you can end your domain in .com .net .us .miami .club – a bunch of stuff. But people automatically enter .com whenever they’re typing a URL into the web browser. So you want to find something that it has a.com available.
If you’re super, super set on something and the .com is not available they
usually have the other options available for you and they’ll tell you what’s
available.
Then finally something that you want to keep in mind is websites run on SEO. Most of the traffic you’re going to be seeing is going to be coming from search engines like Google. So you want to be search engine friendly.
Search engines like to use the words in your domain to figure out what
your website is about. This is something that you can do. It’s optional. It’ll help your search engine optimization.
For example, if you are an artist that is called Yellow Pepper and you paint. Your website has nothing to do with yellow peppers. You can go ahead and get the domain yellowpepper.com. It’s only something that’s optional. It’s something that you want to keep in mind. It’s additional brownie points that you get with search engines like Google.
Now that you have all of those things in mind. Try to come up with a domain that follows those rules.
Okay, that was the sheet that hopefully you guys all completed before we
started here today. If not, I’m going to be talking about a couple of things.
You still have a little bit of time to think about your domain.
The Website Cheat Sheet
The second sheet I want you guys to download is the Website Cheat Sheet.
The number one problem I see with website owners is that they forget how to log in into their website. They forget the username and the password for their hosting company. So this cheat sheet is really simple.
It’s just a little sheet that I put together for you guys. So that you can write your login information and how to access your website. I recommend filling it out, emailing it to yourself, and keeping it in some place safe.
So that you can pull it up next time you have to login into your website
and you don’t remember.
Buying Your Hosting For Your Blog
Okay alrighty, so now that you have these worksheets, you know your domain, and you have this cheat sheet that you’re gonna fill out as we go.
We’re gonna get started. And we’re going to start by buying our hosting.
Click here to Begin Host Gator Hosting
This is how we’re gonna build our website. This is how we’re going to get our free domain. Now, so just to tell you a little bit about what we’re doing here so that you’re not like “Whoa! What’s hosting?”
Why Do I Need a Domain and Hosting to Build a Blog?
Let me tell you a little bit about what is a domain and what is hosting.
Think about your website as a house. Your domain is your house address. Your domain is the URL that we just figured out what it’s going to be – mine is coralgableslove.com.
Your domain is what you tell people when you’re trying to tell them to come over to your house. You give them your address. It’s the same thing for your website.
Now the hosting is your house made out of bricks. Your hosting is
where you’re going to keep all your stuff for your website and all your
stuff is actually files and images. That is why we need hosting.
We are going to purchase the hosting through Hostgator because HostGator
offers a FREE domain. They have a great promotion going on right now which is 60% off your hosting plan. So it’s super affordable hosting. One of the most affordable hosting out there. They have great customer service; and they also offer FREE SSL, which makes your domain secure.
What is SSL? Why Do I Need SSL on My Blog?
If you go to a website and you go to the URL bar you’ll see a little lock up there and that means that your website is secure. That gives people more confidence visiting your website. If you don’t have that little lock some browsers tell visitors, “Oh, this website is not secure be careful.”
So you avoid that and secondly back to that SEO. Google and search engines will give you extra brownie points – SEO juice. If your website is secure.
Question: Doesn’t WordPress Offer Hosting?
So yes, we have a question, “Doesn’t WordPress.com offer hosting too?”
Okay, so when people talk about WordPress it’s a little confusing because there’s two versions of WordPress.
There’s wordpress.org which is the one we’re going to use in this workshop. Which is the one that you build yourself and own it yourself.
And then there’s wordpress.com which, you don’t really own. It is kind of a hosting service but the problem is that it’s not completely a regular hosting because they put some limitations on you. Depending on the plan, you can’t put ads on your website or the analytics are a little more difficult to to keep track of. You can’t put any plug-in in the world that you desire. You can’t put any theme in the world that you desire.
So yes. In short, WordPress.com does offer hosting but we are going to use Hostgator so that we can actually own the entire website without having to follow wordpress.com rules.
Full disclosure we do get commission’s from HostGator. I know this is a free
webinar and if you would like to support us and click on that link so that we can get a commission please click through.
How To Buy Hosting So It’s Affordable
Okay, let’s get our hosting purchased.
The number one problem that people have when trying to buy hosting and they’re trying checkout and the number becomes outrageous. Our immediate reaction is, “I’m not going to spend that much money.”
So I’m going to show you how to get it for about 50 bucks for a year.
Pick The Right Hosting Plan
Click on that orange button that says “Get Started” and it’s going to take you
to the different plans. We want the cheapie, cheapie, cheapie plan of $2.75 a month. It’s called the Hatchling Plan and it has everything that we need. We do not need to pay more. We’re just getting started.
This plan has that SSL certificate I was talking about and they’re giving us the domain for FREE which, usually costs between $12 to $17. So this is a great deal that they have right now. You guys picked a good time to start your website.
Alright, so we’re going to click “Buy Now.”
We want to register a new domain. The domain that I want to buy right
now is TBUsupplies.com so I put .com here in this drop-down and
it’s free. It’s available it’s free for one year. Then it tells you all these
other versions of that domain that are available and we do not want to buy anymore of those domains. We just need the one domain.
If you are looking for the most affordable hosting plan, we recommend unchecking the Add Domain Privacy to your domain box. But if you’re using your home address to set up your domain, you may want to go with Domain Privacy Protection in order to keep that information private.
Selecting The Right Billing Cycle For You
Then we’re gonna choose the hosting plan. What I usually recommend
is purchasing 12 months of hosting, if you’re not sure what’s going to happen with your website after a year.
If you already know that this website is going to last you three years and you’re 100% sure you will not change your domain then, I
would recommend going for the 36 months. Pick the three years because this is very affordable hosting that they’re offering you right now.
I would recommend anywhere from 12 to 24 to 36 months depending on what budget you have. If you’re just trying to do it the most affordable way then I would click 12 months.
Pro Tip: Write Down Your Username, Password, and PIN
You want to put the username that you’re going to use to login into Hostgator and you’re gonna pick a PIN I believe it has to be at least four numbers long. When you call Hostgator for customer service they’re going to ask you for that pin. So make sure you write down this pin in that worksheet that we just downloaded.
Then you’re going to enter your billing information.
Additional Services
If you go to Additional Services we don’t want any additional services. Here they’re charging you $1.99 a month for SiteLock. We don’t want that. Here they’re charging you $2 for backups we don’t want that.
If you did the twelve months like I told you, your total amount should be around $50 for your domain and hosting for one year.
Accept HostGator Term & Conditions
We’re gonna scroll down and we’re gonna check that you have read and agreed to the Hostgator Terms of Service. Once you check that little box, the “Checkout Now” button should allow you to click it. It becomes highlighted and you can click.
After clicking “Checkout Now,” you will see a screen saying that they’re setting up your account. Hostgator is going to be sending you an email with all the account information. Keep an eye on your email for an an email from Hostgator with that information.
We have a question, “Mine is taking a while to finish
setting up, is that normal?” Yes, they have to set up some stuff on their servers for us so it takes a minute. So we’re gonna let it keep thinking for a minute.
Okay so once your account is finished set up, HostGator asks you to fill out a survey. You can just scroll down and click skip. Once you skip the survey, then we are ready to start our WordPress site.
Installing WordPress on HostGator
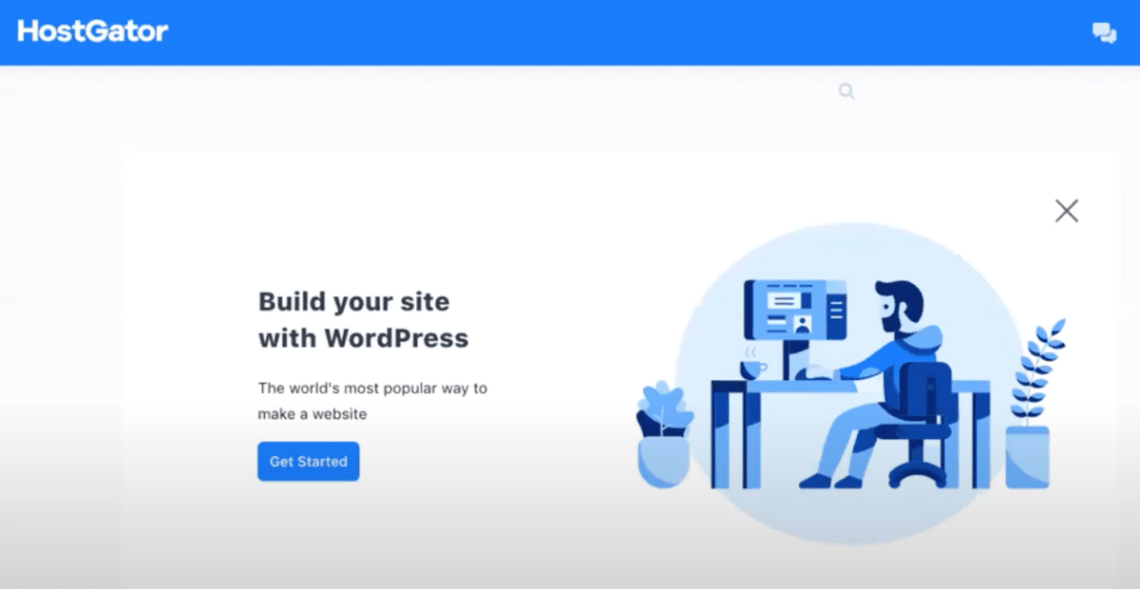
Your screen should look like this. Click on that blue button that says “Get Started”.

So everyone clicked on the button that says “Get Started” and we are going to now click on a button that says “Install Now”.

All right so we’re looking at this screen here. So we are going to leave the version that’s there. We’re gonna install version 5.4. When it says choose installation URL you’re just going to leave that blank.
Filling Out Your Site Settings
Go to Site Settings. We’re going to pick the site name for your website. The domain that I’m buying right now is tbusupplies.com. I’m going to call it TBU Supplies. The other website that I have is called Coral Gables Love. So I
usually put Coral Gables Love in the site name.
Your site description it’s like your motto. You give a little summary about what your website is. When people hover over your website tab, your site description will show up there. It will also show up in different sections of your website depending on what theme you pick. Here I’m going to put just TBU Supplies for now because I’m not really sure with my motto is with my new website.
Pro Tip: Write Down Your WordPress Username & Password

In this section, you’re going to pick your username and your password. Make sure you write this username and password and email in that cheat sheet we downloaded because you’re gonna need this to log in. We can’t forget this information.
You can change the username. It doesn’t have to be admin. You can change that and you have to set up the password. I recommend you make this email an email that you already own like a gmail account. If you forget your
password you can ask it to send you a new password to your gmail account.
Then, we don’t want to select any plugins. We definitely do not
want to dive into the advanced settings and we are not going to pick a theme. In this little box we’re gonna put that gmail email I mentioned before and you’re gonna click “Install.”
Buddy is asking, “Will we add a theme later?” So WordPress already has a default theme. WordPress comes with a default theme and finding a theme that works for you takes a little bit of time. I split that into a separate workshop Installing a Premium WordPress Theme. That
gives you time to add your content, search for your theme with all the
calm and patience that you need. Then you can watch the Install a Premium WordPress Theme webinar replay and install your theme
as I show you how to do that.
Congratulations! You Installed WordPress!
Now that you installed it. You want to again write in your cheat sheet. You want to write two URLs in your cheat sheet. One is your domain the one you
bought. Mine was tbusupplies.com. The other is the URL for the login to your blog’s dashboard.
You’re going give your domain tbusupplies.com to all of your friends and family to go check out your website. But when you want to go in and add an article you’re going to go into what we call the dashboard. To get into the dashboard you have your own URL that’s a little different and it’s yourdomain.com/wp-admin
Make sure you write that in your sheet so you don’t forget. That’s how you are going to log in and there really is no other way to get to that page if you forget it. So write that down.
Now, we are going to click on the administrative URL (yourdomain.com/wp-admin) and see if we are able to log in.
Success! You’re in your dashboard. Congratulations! You built your website!!! You have your own WordPress website.
WordPress 101: Navigating the Dashboard
A little bit of info so that you know what’s going on here. In case this is
your first time ever using WordPress.

How does WordPress work?
Whenever you’re going to create an article you’re going to go to your dashboard. Your navigation is on the left hand side and you’re going to use these links to put content on your website. Once you create posts, that’s
what’s going to publish new articles on your blog.
Before we dive into that let’s just quickly make sure that our website is set up properly. First we’re going to go to that navigation on the left hand and we’re gonna go through settings really quick.
Display Your Latest Articles On Your Home Page
Go to “Settings” > “Reading”. Here you want to select that your home
page displays your latest posts. When people go to your website
they’re going to be seeing all the latest articles that you’ve written there. Here you can also pick how many articles you want to show on your home page. Put any number you like. The default is 10.
Pro Tip: Make Your Links SEO Friendly

Next, we want to double check the permalinks. The reason we want to go into “Settings” > “Permalinks” is because that’s how the links to your articles are built. We want to make sure we pick the one that is the best option for search engine optimization. Pick the option that is “Post name”.
Setting Up Your Categories
The next thing we want to do is we want to go to “Posts” > “Categories”. Here we want to add a couple of categories for the types of articles we’re going to write.

Let’s say you’re going to write about fashion. We’re going to add a new category that’s called fashion. On the other hand, if you’re if you’re a food blogger and you write recipes, then your category could be the type of recipes. Maybe you share recipes and then you also write about food styling or food photography.
For now, we’re going to add just two different categories to show you
how it’s set up.
Enter the name of your category capitalizing the first letter of your category.
In the slug field you want to use all lowercase. The slug creates the URL for that category. We want it to be the exact words you put in the category field but just lowercase. If your category has more than one word, replace each space with a hyphen
For example, if your category is “Fashion Styling” then the slug is going to be “fashion-styling.” Scroll to the bottom and click “Add New Category.” You can see it show up under your categories.
Now add as many categories as you need for your blog.
Creating Your First Page
Now, we’re going to go back to that menu on the left hand and we’re going to look for “Pages” > “Add New”. We’re going to create our About Me page. Click on “Add Title” and we’re just going to start typing “About Me”.

The way the new WordPress works is with blocks. When you want to add something to the page you click on this little block and it gives you options of what you can add: a paragraph, an image, a heading, etc.

For SEO it’s recommended that you have headers. Each header helps tell Google what your page is about. I’m going to add the first heading. It’s going to say “About Me”. The default block is a paragraph, but if I click on a block all these options pop up. Use those options to switch it from a paragraph to a heading.
How To Add A New Block in WordPress

There are two ways to add a new block in WordPress. The first option is to simply press Enter; and WordPress will create its default paragraph block.
If you’re looking to add a specific type of block, let’s say an image, hover over the block above where you’d like to add the image. A little plus sign pops up. When you click on the plus sign, you’ll see all the types of blocks you can add to your page or post.
Perfect, so you added a header, a paragraph, and an image.
On the right-hand side you see the menus for for certain things. If you click on a Block, you see certain options for that specific block.

At the top of the settings you also have a tab for “Document” settings. If you click on that tab you see the settings for your entire About Me page.
We are going to publish our About Me page right now. In the future, if
you want to write a post or page and make it go live tomorrow you would click and instead of “immediately” you would pick the day and time that you want to publish.

If you want to see what it’s going to look like before you publish, click “Save Draft” first and then you click “Preview” to review your work.
Clicking preview automatically opens it up in a new tab so that you can see what the page is going to look like. I like what I see so I click “Publish”.
Now add all the pages you need for your site. Don’t forget to add a Contact Me page and list your email address in that page.
Creating Your First Post in WordPress
We are going to create two sample posts for each of our categories. Using your left-hand navigation go to “Posts” > “Add New”. Create your post just like you created your page. Add a title, a header, some paragraphs and an image.
Adding a Featured Image to Your Post
Depending on your theme, your post’s featured image will show up in different places. For example, if you go to my blog coralgableslove.com, all of these thumbnails across my site are the featured images for each post.


Whenever you write a blog post, make sure you always add a featured image. To add a featured image, click on the document tab on the right-hand settings. You’re going to see a bunch of options. Scroll down until you see “Featured Image”. All you have to do is click and upload an image that you want to be featured.

Pro Tip: Add Alt Text to Every Image to Improve Your SEO
For SEO, I recommend to make sure you always fill out your Alt Text (Alternative Text) for all of your images.
What is Alt Text? Alternative Text is used for visually impaired
visitors to your website. Special devices read out-loud whatever is in your alt text describing what the image is about.

Search engines also use Alt Text to help them figure out what your article is about. Search engines use text to organize the websites so they can then give the best search results when people are looking for something. Since search engines can’t read images, they use the image name and the alt text to figure out what the images in your post are about.

Categorizing Your Post
Now, we want to categorize the blog post that we just wrote and we want to categorize it with one of those categories that we created previously. Categorizing your post will allow you to add a category to your navigation menu that shows all your posts in that specific category.
Go ahead and publish your post and create blog at least one blog post for each category you created.
Let’s go to our main website. Mine is going to be tbusupplies.com. Our site now shows our posts in the home page. The WordPress install came
with a demo blog post of its own called “Hello World!”. You can go ahead and delete that post. Go to posts, check the one that says “Hello World!” and delete it.
Customizing Your WordPress Blog
At the very top of your site there is a black navigation bar. Click on “Customize” on that bar. Here is where you guys can poke around and start to make your blog look more how you like it. If you don’t like the background cream color you can change it to white and you’re gonna do that all through these options in “Customize”.
When you make a change, you have to click “Publish” at the top or else your changes are not saved.
Start with the first option “Header & Logo Settings”. This is where we can add our logo. Click select logo you and find your logo in your computer.
Creating Your Blog’s Menu
Let’s set up that menu – one of the most important things on your website.
Go to “Customize” > “Menus”.
Create a new menu and we’re gonna call it Main Menu. It’s asking where you want this menu to appear. We’re going to select when you’re using a computer and when using a mobile device and click “Next”.

Click “Add Items” and click on a page you’d like to add under “Pages”. You’ll see it appear on the menu on the left-hand side.
Now if you want the navigation to show you all the posts that you wrote under a specific category, go to “Categories” and click on the category you’d like to add to your menu.
So that’s our menu. Click “Publish” and let’s go see if our menu has been updated. Click the X at the top left-corner to exit Customize.
You have your pages, your posts, and your menu. Your website is ready to go. Poke around in this customize menu so that you can change the settings on your site to make it your own.
Now it’s time to start publishing content.
You Built You Blog. What’s Your Next Step?
Let me just show you what really what could be your next step.
Right now you are set to go. You can start writing your content. Start
customizing the colors to make it. Finalize the main pages of your website.
Write a kick-ass About Me page.
Your About Me page is one of your most visited pages on your website because people want to know who is behind your website. Who is doing all this writing? What is this website is all about? The About Me page is where
they’re going to go to find the answers to those questions. So you want to make sure you write a really nice about me page.
We are having another webinar with an excellent writer and educator called Lia Seirotti and she’s going to be walking you through writing a kick-ass about me page. If you guys would like to sign up for that I think it’s happening in two weeks.
Install a Premium Theme on Your Blog
Another step you can take now is to go and look for a premium theme that
matches your branding a little better. There’s all of these websites that sell
WordPress themes and you can buy a theme.
Click and watch the Install a WordPress Webinar replay. I show you how to install a WordPress theme that you purchased.
Where to Buy a WordPress Theme
These are the two places that I recommend where to purchase a theme.
Theme Forest
Etsy WordPress Themes
My number one option is always Theme Forest. I can show you a little
bit about how to find a theme that works for you.
What I like about purchasing WordPress themes through ThemeForest is that they really let you preview the websites. If you shop for themes through other stores it’s really hard to preview the theme. For example, Etsy sells themes but it’s hard to preview them and it’s hard to get an idea what the website is going to look like from just screenshots.

I love Theme Forest because when you click “Live Preview” it takes you to the actual demo website. You can see here that the theme has several options.
What’s great about the themes on Theme Forest is that they have a ton of different options that you can pick from and you only have to buy one theme.
What To Look For In A WordPress Theme
There are certain things that you want to look for when you’re looking for a theme.
- High Ratings – this theme for example has 5 stars
- Lots of Sales – this theme has been purchased over a thousand times. You want to make sure lots of people have used this theme.
- Responsive Layout – the theme adjusts to the size of your screen whether you’re on your laptop, your tablet or mobile device. If you pick a theme that is not responsive, not only are your visitors going to have a terrible experience, Google is going to dock you points if your site is not responsive.
- Updated Recently – the theme should have been updated within the last 6 months.
- E-Commerce – if you want to add e-commerce to your website you want to make sure it’s compatible with WooCommerce because that’s the online store plugin for WordPress.
I recommend the theme Sitka for all my beginner bloggers. It’s beautiful and modern.
If you buy this one theme. It comes with all of these options. So if
you like how any of these demos look like, then this would be a theme for you.

If you’d like to install this theme. I have a FREE tutorial on how to install the Classic Sitka WordPress theme. This theme has a slider at the top where
you can put featured articles and clickable banner images if you want to highlight certain things on your site.

You built your website! I’m so proud of you! Give yourself a round of applause. That was tricky but you got it done.
Next Steps After Webinar Completion
Yes! You built your WordPress website. Congratulations! Now you have some homework to complete your site and take it to the next level.
Now that your website is up and running, it’s time to add all the amazing content you’ve created. Here are a few pages that you definitely want to have on your website:
About Me Page
The About Me Page is one of your most important pages on your website. Your readers, customers, and potential partners/collaborators will go to your About Me page to know what you are all about and to find if you are a good fit for them. An effective About Me Page answers all the questions a visitor might have and establishes your authority on the subject of your website.
Contact Me Page
Your contact page is another important piece of your website. Maybe a visitor wants to buy a product from you, a brand representative wants to pitch a partnership with your blog, or someone else has a great idea for a collaboration. Make sure you list your email on your Contact Me Page along with links to your social media channels.
Develop A Blogging Strategy
Take the guesswork out of building a successful blog by enrolling into Blogging Bootcamp.
Click here to register for Blogging Bootcamp
Customize Your Website To Match Your Brand
You have a website up and running and that’s all you need to share your message and purpose with the world. Go ahead and add your content and promote it via your newsletter and social media channels.
Nonetheless, if you’d like to give your website a different look from the default WordPress theme, you still have a bit more work ahead of you. The first step if finding a WordPress theme that better aligns with your brand. Search for a premium theme that looks like your desired website and offers the features you are looking for.
Where to Buy a WordPress Theme
Theme Forest
Etsy WordPress Themes
